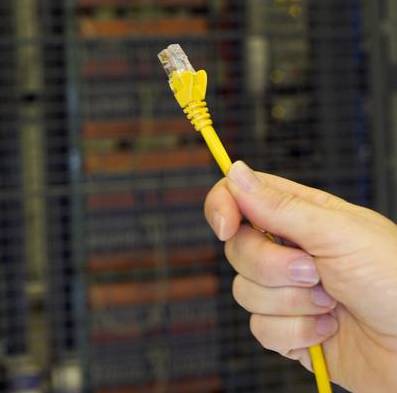
An Ethernet crossover cable is a type of Ethernet cable used to connect computing devices together directly. Normal straight through or patch cables were used to connect from a host network interface controller (a computer or similar device) to a network switch, hub or router. A cable with connections that “cross over” was used to connect two devices of the same type: two hosts or two switches to each other. Owing to the inclusion of Auto-MDIX capability, modern implementations of the Ethernet over twisted pair standards usually no longer require the use of crossover cables.

This how-to is for all of you that enjoy the DIY your Ethernet Crossover Cable or have more time than money. It is far easier to buy a ready made cable but not near as fulfilling. Plus, there are those times when you need a cable now and can’t get a ready made quick enough.
You will need a length of network cable (UTP-Cat5), preferably a factory assembled straight through cable that comfortably reaches each computer. Be careful and measure accurately you would hate to find out that following the baseboard of the wall you end up two feet short. On the other hand you don’t want to use a fifty foot cable to connect two computers ten feet apart. Ethernet does not like coiled up excess cable. Consider making the cable with enough slack to allow servicing the computer without needing to unplug the cable.
The hardest part for most people will most likely be finding the RJ45 cable connectors. Check with your local computer stores that do network installations, most techs will give you a couple if you ask. Otherwise you will have to buy a five or ten pack. Make sure you get at least two, three is better. That way if you mess up you can just cut off the bad end and try again. Cut off the RJ45 connector from one end of the cable and prepare the end for the new RJ45connector. I don’t use measurements for stripping the cable end, I start by stripping at least 1 inch of the main cable insulation and then carefully trim the eight internal wires using the factory assembled end as a guide to the proper length. Just make sure that each wire is equal length and that the connector cable lock pinches the main cable insulation.
You don’t need any fancy crimping tools to make one cable, just one normal size screw driver and one small screwdriver with a blade the same thickness’ of the brass conductors in the RJ45connector. You may need a second pair of hands to help hold the cable and RJ45 connector while you or your helper secures the connector cable lock. It’s a little tricky to get all the wires into the proper holes but with a little patience anyone can do it. When it comes time to securing the connector cable lock use the normal size screwdriver that fits into the connector cable lock slot. It doesn’t take a lot of pressure to seat the cable lock just tap lightly until the cable is secure.
Note: Make sure ALL wires are pushed completely into the connector before seating the connector cable lock.
Once the connector cable lock is secure it’s time to move on to seating the brass wire conductors. This is probably the most tricky part, each wire has a separate brass conductor that needs to be seated to make contact with the wire. Once again you will want a second pair of hands to hold the RJ45connector while you or your partner carefully seats each of the brass conductors. Lightly tap each conductor down with the small thin screwdriver to just below the plastic ridge, use the factory assembled end of the cable as a guide for how deep to seat the brass conductors.
Note: A pliers can be used to press down all the brass conductors at one time to the plastic ridges, then use the small thin blade screwdriver to finish seating to the proper recessed level.
Tutorial: How to Wire an RJ-45 Console Cable?
That’s it, if everything went well you now have an Ethernet UTP Category 5 crossover cable.
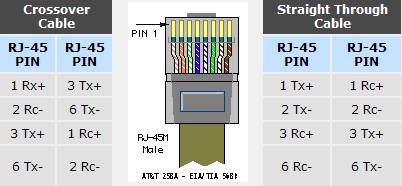
Note: The standard connector view shown is color-coded for a straight thru cable
Category 5 wiring standards:
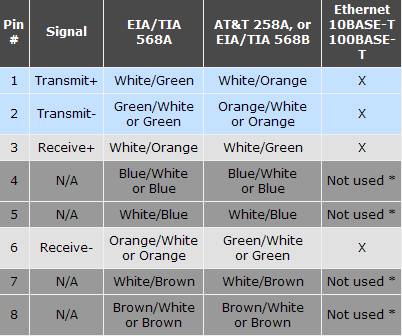
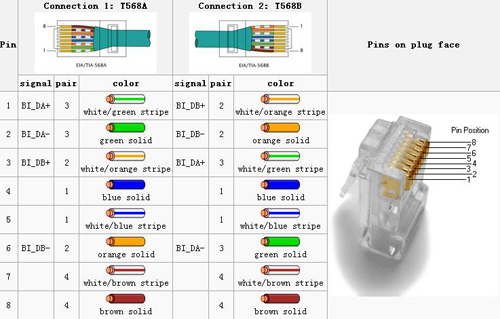
EIA/TIA 568A/568B and AT&T 258A define the wiring standards and allow for two different wiring color codes.
- Pairs may be solid colors and not have the stripe.
- Category 5 cable must use Category 5 rated connectors.
Only two pairs of wires in the eight-pin RJ-45 connector are used to carry Ethernet signals. Both 10BASE-Tand 100BASE-T use the same pins, a crossover cable made for one will also work with the other.
Two pairs crossed, two pairs uncrossed 10BASE-T or 100BASE-TX crossover
*Note: Even though pins 4, 5, 7, and 8 are not used, it is mandatory that they be present in the cable.
More Related: How to Make Cisco Console Cables?


Network-King: How To Make Your Ethernet Crossover Cable? >>>>> Download Now
ReplyDelete>>>>> Download Full
Network-King: How To Make Your Ethernet Crossover Cable? >>>>> Download LINK
>>>>> Download Now
Network-King: How To Make Your Ethernet Crossover Cable? >>>>> Download Full
>>>>> Download LINK Fu